
Brood Pairs
In order to breed clownfish, you will need a mated pair. The easiest way to do this is to purchase a mated pair. Often times your local store can order a mated pair or import these. You can also purchase two small clownfish when they are young. When clownfish are young, they are always males. Once they have determined the dominant fish, it will change sexes into a female. After some time, you will be be able to tell which is the female because it will always be larger. This comes after much fighting between the two fish.
Brood Tanks
Ocellaris broodstock is preferrably kept in separate tanks for their privacy and ease. Make sure water quality is high (low phosphates and nitrates) and use proper filtration. Keep the dividers colored (black) so that the fish couples cannot see each other; Ocellaris are known to be aggressive to each other.

Image Courtesy of MBI Forum
Either tiles or ceramic pots can be used to house the fish so that they can spawn on them. This makes it easier to remove the spawn from the tanks by removing the tile or ceramic pot and replacing them afterwards.

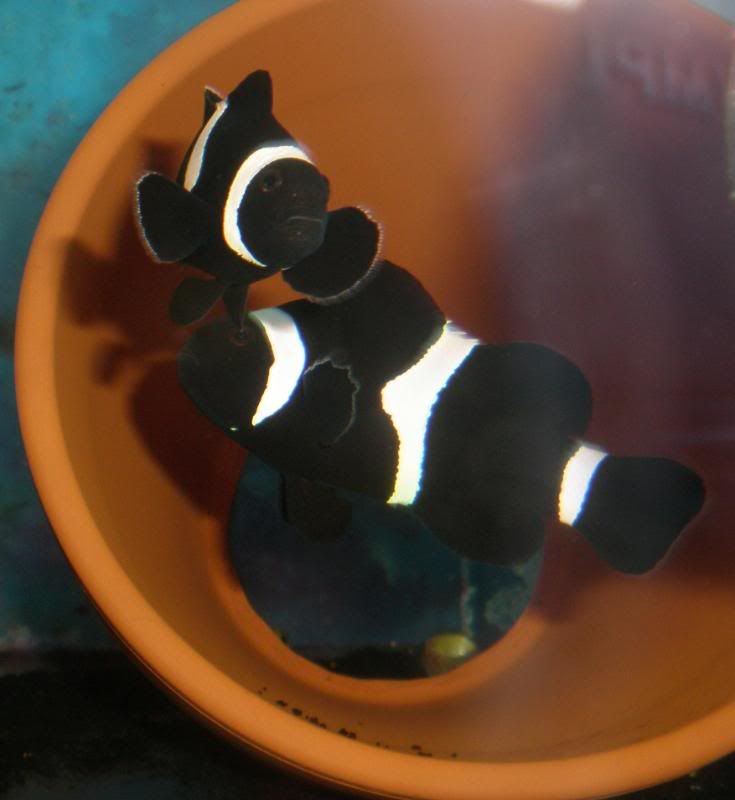
Image Courtesy of MBI Forum
Broodstock Feeding
Feed the broodstock as often as possible (3-4x per day) a variety of foods: from pellets, flakes and mixed foods. The more often you feed the better the fish’s health will become; laying eggs takes a lot of energy!
Egg Laying/Hatch Night
If you were lucky enough see the spawning event you can estimate when they will hatch. Depending upon species, the eggs should hatch between day 6 and 10 after the spawning event, usually not long after lights out. The most common species, A. ocellaris and A. percula will hatch in 7-8 days.
Newly spawned eggs will usually be bright yellow, orange or red. Over the next several days the eggs will darken and then appear “silver” around day 7 or 8. The “silver” is actually the eyes of the larvae reflecting light. This is a good indication that they are close to hatching.
| Species | Incubation Time | |
|---|---|---|
| Amphiprion ocellaris | Ocellaris Clownfish | 7-8 days |
| Amphiprion percula | Percula Clownfish | 7-8 days |
| Amphiprion clarkii |
Clark’s Clownfish | 6-8 days |
| Amphiprion fenatus | Tomato Clownfish | 8-10 days |
| Amphiprion polymnus | Saddleback Clownfish | 7-8 days |
| Amphiprion nigripes | Maldives Clownfish | 7-8 days |
| Premnas biaculeatus | Maroon Clownfish | 6-8 days |
During the afternoon before they are expected to hatch, move the clay pot, or ceramic tile, to a stand alone 10gallon tank that has been filled with about 6 gallons of water from the broodstock system. This tank should be kept at the same temperature as the broodstock system.
Here is what the eggs look like at the moment I transfer the pot to the hatch tank. (Note that the tiny eyes are visible in each egg.)
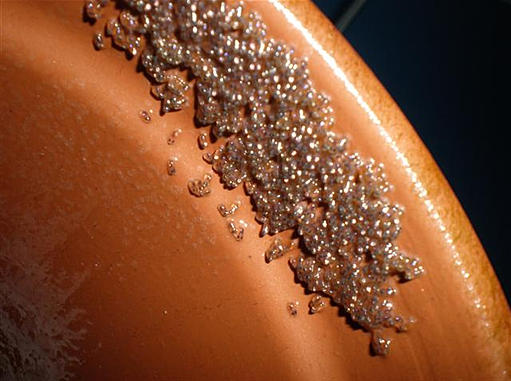
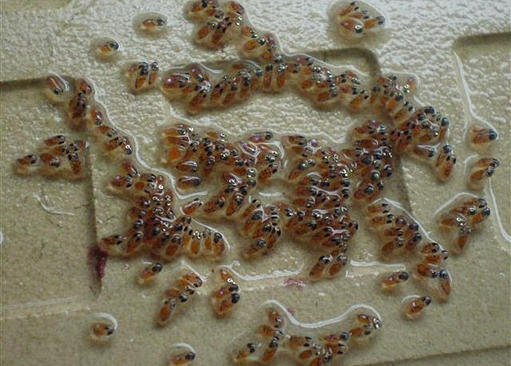
Image Courtesy of Fishtal Propegations
Fry Tank
Place an airstone inside the pot or underneath the tile to aerate the eggs with a gentle flow of bubbles. This takes a bit of tweaking… too slow and the eggs will succumb to fungus, too fast and the eggs will get bounced around too much. Now just sit back and wait for the eggs to hatch
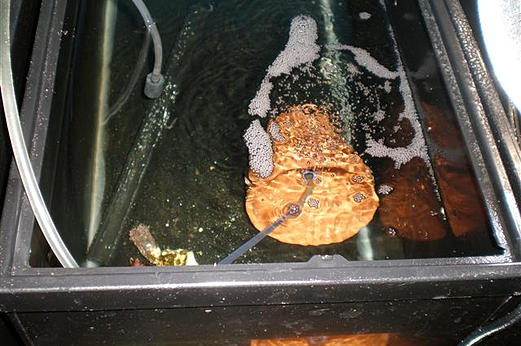

Image Courtesy of Fishtal Propegations
I prefer using round black tubs as initial fry tanks; the sides are black and fish cannot get stuck in the corners due to the flow.

Fry Feeding and Care : Day 1

The next morning I add enough IA to tint the water green. Next I harvest rotifers from the culture vessel and add them to the hatch tank. This is know as the “Greenwater” method. Getting the density of phytoplankton right is more of an art. You want it green enough so that you can’t see the bottom of the tank, but not too dense. The same goes for rotifer density. In short, you want enough rotifers so that each larvae has plenty to eat and not waste too much energy searching for food. Rotifers will look like dust in the water.
It is possible that all of the eggs won’t hatch at once, in this case I leave the tile/pot in the tank for another night for the rest of them to hatch.
After all eggs have hatched, remove the pot and increase the airflow slightly.
Don’t forget to add top off water to make up for evaporation.
Notes about Greenwater: The basic premise of the greenwater method is two fold. Phytoplankton provides a food source for the oganisms that the larval fish will be eating. Tinting the water with the phytoplankton also provides visual contrast for the larvae to find the food oganisms. If the water is too clear the larvae have a hard time finding their prey. In this instance the larvae will expend too much energy going after food items that are too far away.
As mentioned above, the exact amount of phytoplankton to use will depend on the rearing vessel and the rotifer density. In general you don’t want to be able to see the bottom. As the rotifers feed on the phytoplankton the water will begin to clear. If the larvae start to gather at the sides of the tank more phytoplankton should be added.
Fry Feeding and Care : Day 8-20
Around day 14 I start to siphon detritus off the bottom of the tank each day. Being carful not to siphon the larvae. On average I will siphon out about 1/2 gallon of water and replace it with 1 gallon of water from the broodstock system. This will gradually increase the water volume in the tank as well as provide clean water. At this point I also add a sponge filter to replace the airstone and I stop adding phytoplankton. The water will clear up in a few days.
Fry Growout : Day 21